
Loyalty Essentials clients have access to a library of pre-defined Segment templates. These Segment templates address many common marketing use cases and contact strategies, and are intended to serve as a quick starting point for segmenting Members into targeted audiences. You can simply copy a Segment template, optionally adjust the selection conditions to meet your specific requirements, then publish and use the new Segment.
Note: Segment templates are “static” by default, meaning that they need to be manually refreshed to reflect changes to Member inclusion in the Segment. Please see Getting Started with Segments to see optional ways of automating the process of refreshing Segments.
To create a Segment from a template:
-
Select Members from the top navigation bar, then select Segments from the side navigation menu. The Segments screen is displayed.
-
Search for and select the desired Segment (see Search for a Segment for more information on the available search options). The Segment Details screen is displayed, with the Rules tab selected by default.
Hint: All the Segment templates are named using the convention “TEMPLATE: <Segment name>.” Searching for the text string “template” can be a useful way to filter the Segments screen to show only the Segment templates.
-
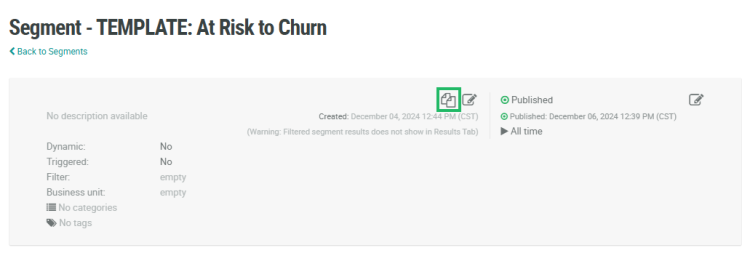
In the header section of the Segment Details screen, click the Copy icon.
-
The system creates a new Segment and displays the Segment Details screen. The default name of the new Segment is the name of the base Segment template, followed by an incremental counter, such as "(1)."
-
To rename the Segment, click the Edit icon within the header section. The Edit Segment pop-up window is displayed.
-
Enter a descriptive name in the Display Name field.
-
When cloning objects, the recommended best practice is to change the new object’s internal name so as to avoid any duplicate name issues if you clone this object again in the future. Check Edit Internal Name to make the Internal Name field editable. A confirmation dialog box is displayed; click OK. Enter a new internal name.
Note: The internal name must be unique and can not include any special characters or spaces; only numbers, letters, and underscores are allowed. Do not change the internal name once the Segment is published.
-
Click Save.
For additional information on how to configure the new Segment, please see the following Help Center articles:
